
The realm of technical SEO is rife with acronyms, but we’ll focus on two of the most widely used ones today: HTTP and HTTPS.
This article will go through how to redirect from HTTP to HTTPS in detail. We’ll go through the differences between HTTP and HTTPS, why redirects are crucial, and how to put one up with your domain server.
What Is the Difference Between HTTP and HTTPS?
HTTP and HTTPS are two different types of transport protocols. The usual protocol for accessing the internet with a browser is HTTP (or Hypertext Transfer Protocol).
As a user, you make requests by prefixing a web address with HTTP, and you’re presented the material you’re seeking for as a response.
The HTTP protocol is essentially a messenger that transports your request to the web server and returns the information you requested.
The URL you type into the search field to do all of this looks something like this:

“Hypertext Transfer Protocol Secure” is an abbreviation for “Hypertext Transfer Protocol Secure.” HTTPS web pages, unlike HTTP web sites, contain an additional degree of protection.
SSL encryption (through a secure certificate from a third-party provider) ensures the security of your connection to the server. Third-party attackers are less likely to gain access to any data you give with the site because of the extra protection.
The client (e.g., your browser) and the server communicate with each other to establish a secure connection. The client establishes a connection with the server, which responds with a digital certificate containing the server’s identify. Both use HTTPS to send and receive data, exactly like they would with HTTP.
This is the URL you’d see in your browser’s search bar:

Why Should You Make the Switch to HTTPS?
In 2014, Google stated that HTTPS would be used as a ranking indicator to encourage websites to demonstrate that their users’ data will be kept as safe as possible.
Using HTTPS as a site owner is another technique to demonstrate to users that your site is reputable and safe.
Using an HTTPS protocol demonstrates to users that you have the EAT factor: expertise, authority, and trustworthiness.
This is quite valuable, so if you’re still using the HTTP protocol, it’s certainly time to upgrade.
How to Change an HTTP URL to an HTTPS URL

Change an HTTP URL to an HTTPS URL
Your website’s host will determine how to set up the redirect from HTTP to HTTPS. However, before you go into the details, there are a few things you need take care of first:
- For your website, select an SSL certificate.
- Inform Google of your new protocol.
- Your internal connections should be updated.
Update your internal links
After you’ve straightened out the redirect, double-check that your internal links have HTTPS URLs and are still working properly. You may use a web crawling tool to check for any broken links and see what needs to be changed. Our Site Audit tool comes highly recommended.
Your web host will most likely make the necessary modifications. We’ll walk you through the process of getting started with four of the most popular web hosting.
On WordPress, how do I redirect to HTTPS?
There are a few different ways to convert HTTP to HTTPS if you’re using WordPress to host your website.
- Using a Plugin
- Manually editing WordPress files
We’ll walk you through the process right now!
Use a Plugin
For novices, this is a really simple way. Install and activate an SSL plugin first. The plugin automatically performs the following tasks:
Checks the validity of your SSL certificate
- This plugin forces WordPress to utilize HTTPS in URLs.
- Create redirects
- Looks for URLs that are still using HTTP and redirects them.
After you’ve installed the plugin, you’ll need to keep it active on your site; disabling it might result in performance and content difficulties.
You can download the WordPress plugin in the link below:
Manually edit the WordPress files
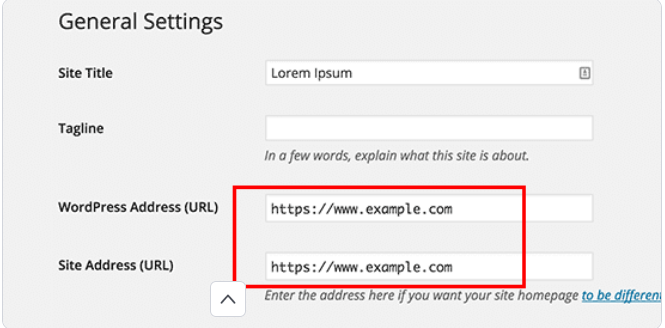
To make changes to your WordPress files, go to General Settings and change your WordPress and site URL addresses from HTTP to HTTPS.
Then, in your .htaccess file, put up your redirects:
<IfModule mod_rewrite.c>
RewriteEngine On
RewriteCond %{HTTPS} off
RewriteRule ^(.*)$ https://%{HTTP_HOST}%{REQUEST_URI} [L,R=301]
</IfModule>
Does it appear perplexing? Here’s how it works:
"RewriteEngine On" turns on the rewrite engine, while "RewriteCond %{HTTPS} off" checks for an HTTP connection.
“RewriteRule ^(.*)$ https://%{HTTP_HOST}%{REQUEST_URI} [L,R=301]" uses a 301 status code to convert HTTP to HTTPS.
WordPress should now use HTTPS to load your site!
In the WordPress Admin Area, enable HTTPS
The WordPress dashboard will be the first area where you may use the new secure connection. You can ensure that when a user logs in, their information is sent safely by first protecting the back end.
To do so, go to your WordPress root folder’s wp-config.php file and add the following line anywhere before where it says That’s all; no more editing!
define('FORCE_SSL_ADMIN', true);How to Use Nginx to Perform an HTTP Redirect
There are a few options for redirecting HTTP to HTTPS if you’re using Nginx as your web server.
- All HTTP sites should be redirected to HTTPS.
- Redirect certain websites
- Let’s take a closer look at them.
All HTTP sites should be redirected to HTTPS
This strategy is used when you know you want all of your sites to utilize HTTPS exclusively. Simply modify the following in your Ngnix settings file:
server {
	listen 80;
	listen [::]:80 default_server;
	server_name _;
	return 301 https://$host$request_uri;
}
Here’s what the code implies in practice:
"listen 80 default server" sets the server block as the default for any mismatched domain, while "return 301 https://$host$request uri" sends all traffic to the right HTTPS server block. The request domain name is stored in $host.
If you have several applications or sites and don’t need an SSL certificate for each one, this is the way to go. Once again, all it takes is a simple code change:
server {
	listen 80;
	server_name example.com;
	www.example.com;
	return 301 https://example.com$request_uri;
}
As you can see, there is no “default server” in this code. Instead, it concentrates on a single host name. Let’s have a look at how it works:
“listen 80” tells the server block to ‘listen’ for connections on port 80 (HTTP). “server name example.com; www.example.com” tells the server block to specify the server domain names. Of course, “example” should be substituted for your domain name.
“https://example.com/return 301”
The variable “$request uri” guarantees that traffic is forwarded to the site’s HTTPS version. The ‘301’ redirects the user to an HTTPS version of the specified URI.
For the modifications to take effect, you’ll need to restart or reload Nginx. You’ll be ready to go after that!
How to Use Apache to Perform an HTTP Redirect
It’s very simple to switch if you’re already using Apache.
It’s straightforward to set up a redirect in the Apache Virtual Host domain configuration file if you have access to the root server. If you can’t, go into your. Htaccess file and make the necessary modifications.
Apache Virtual Host redirection
You set your generic site document root and then adjust the security policy for the individual sites when you utilize the Virtual Host.
Use a straightforward redirect directive, such as this:
<VirtualHost *:80>
	ServerName example.com
	ServerAlias www.example.com
	Redirect permanent / https://example.com/
</VirtualHost>
<VirutalHost *:443>
	ServerName example.com
	ServerAlias www.example.com
</VirtualHost>
When you look at it more closely, it all adds up to this:
“VirtualHost *:80” monitors the 80 port (HTTP) for connections from the domain you provide.
“VirtualHost *:443” monitors the 443 port for connections (HTTPS)
“Redirect permanent / https://example.com/” enables traffic redirection to the HTTPS site by replacing “ServerName” and “ServerAlias” with your domain name.
It will take effect after you restart your server.
.htaccess redirection
If you’re using. Htaccess to redirect, you’ll need the mod rewrite module, which is usually installed by default on most servers.
Simply add the following code to your root. Htaccess file:
RewriteEngine On
RewriteCond %{HTTPS} off
RewriteRule ^(.*)$ https://example.com/$ [L,R=301]
Let’s take a closer look:
“RewriteEngine On” turns on the rewrite engine, while “RewriteCond %{HTTPS} off” checks for an HTTP connection.
“RewriteRule ^(.*)$ https://example.com/$ [L,R=301]” With a 301 status code, this transfers HTTP to HTTPS. Just make sure you replace ‘example‘ with your domain name!
The advantage of using .htaccess for redirection is that you don’t have to restart anything for it to work.
How LadiTech expert can help you to migrate from http to https?
LadiTech’s enterprise-grade, full-featured Web Development Experts can help you transfer your website from Http to Https in a matter of minutes.